Instructions
Hardware Preparations
Power on the Macquirer 516 data acquisition system by pressing the power button on the back of the unit underneath the DC plug. The system can operate on either battery power (up to 2 hours) or DC power (unlimited).
Ensure that the following connections are made before attempting to collect data:
- The Macquirer 516 is connected to the Macintosh laptop with a USB cable
- The transducer is connected to the Macquirer 516
- The tubes for oral flow and oral pressure are connected to the correct ports on the transducer (labeled)
- The tube for nasal flow (if desired) is connected from the nasal mask to the nasal flow port on the transducer (labeled).
After sanitizing the masks, proceed to the Software Preparations.
Software Preparations
Log into the Macintosh Powerbook (see KUPPL administrators for access) and load Macquirer 8.9.2 by clicking the shortcut on the desktop or in the dock.
NOTE: You may need to attach the dongle (looks like a USB flashdrive) to the computer before the software will load. If a USB mouse is attached, remove it and insert the dongle. Once the software has successfully loaded, the dongle may be removed and the mouse reattached.
Check the following settings before attempting to collect data. In the menu, go to Options » Record/Play…
- Set the recording time to the desired length. The default is 5 seconds. The input source should be “Mic” and the play source should be “Computer.”
- Be certain the correct channels are active (shown by a checkmark) for the data you wish to collect.
- The Audio channel is always active. This is the microphone on the transducer.
- Channel 1 is Oral Flow.
- Channel 2 is Oral Pressure.
- Channel 3 is Nasal Flow.
- Channel 4 is unused
Once these settings are made, Save and Close the options window.
Proceed to Recording and Analyzing Data.
Recording and Analyzing Data
Before the recording begins, the speaker should have the mask(s) firmly in place. The oral mask is pressed against the face manually, while the nasal mask is attached around the head with Velcro straps (pictured below).
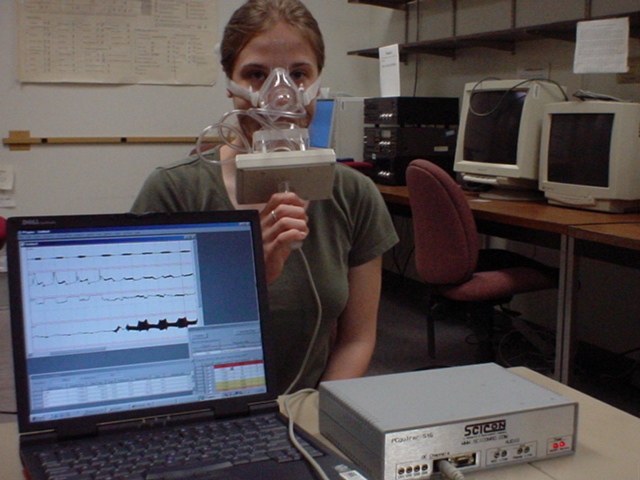
- Both masks should make near-airtight seals against the face. A tighter seal will result in more accurate aerodynamic data.
- The Oral and Nasal Flow tubes are unobtrusive and are simply attached to their respective masks.
- The Oral Pressure tube must be inserted between the lips to properly measure the pressure in the oral cavity. It should be kept clear of saliva for best results.
To begin recording, go to the menu and select Record/Play » Record. If this option is grayed out on the menu, open a new document in Macquirer by going to File » New. The option to record should now be available.
Once the recording time has expired, the results will be automatically displayed in synchronized waveforms corresponding to the selected input channels (labeled in the upper-left of each window).
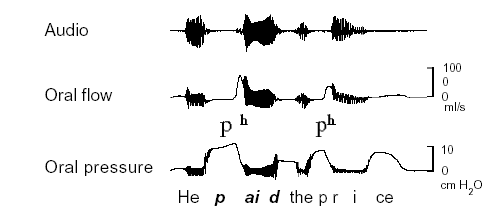
- The top window (Audio) shows the vocalization data recorded by the microphone. Note that the quality of the speech signal is slightly degraded by the masks.
- The second window (ch1) shows the Oral Flow data.
- The third window (ch2) shows the Oral Pressure data.
- The fourth window (ch3) shows the Nasal Flow data.
Combined, these waveforms can easily distinguish nasals from aspirated stops, for instance. Nasal flow is significantly higher during nasals than elsewhere; likewise, a buildup in oral pressure is evident before a stop, and oral flow sharply increases at the release of that stop.